|
During the past few weeks two of my projects have been released. A magazine article and a knitting pattern: 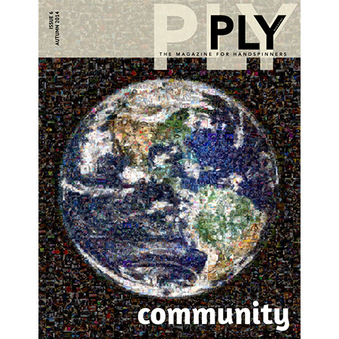
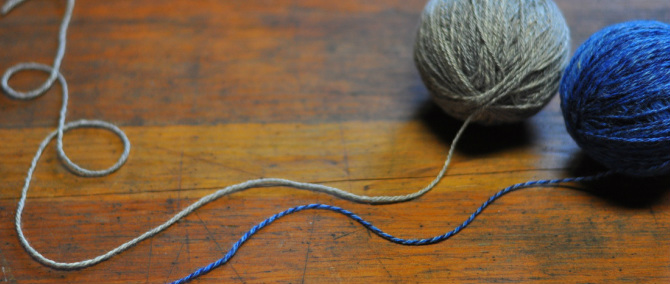
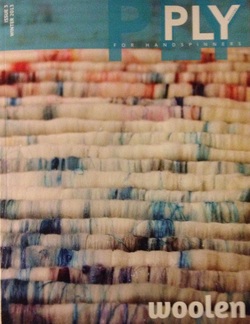
In the Autumn 2014 issue of Ply Magazine, I write about spinning, and the Men's Knitting Retreats. (and of course, as I try to write here about the article, I realize how difficult it is to write about writing!) haha 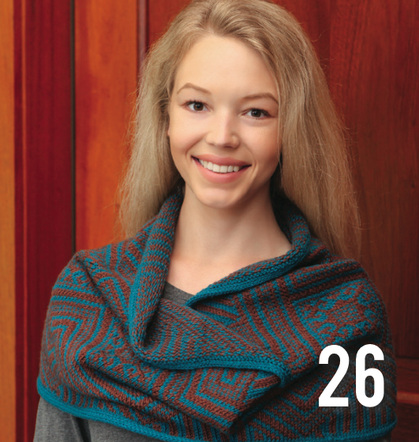
Also, the latest Cast On magazine features my latest pattern, Thara. This is a fun colorwork cowl that was inspired by Thai weaving.
The studio continues to buzz with activity. Working hard on the book, and I have a few other designs clicking their way through the process on their way to publication. This fall promises to be busy, and I'm looking forward to moving through the "to do" list that's filled with such exciting things! KW Back on February 4, 2014 I was the recipient of the Daily Point of Light award! What's funny is I didn't know about it until their office contacted me to get my shipping address! Founded by President George H. W. Bush, the program recognizes people or organizations who work to make a difference in their communities. Most people who know me are aware of my desire to use the fiber arts as a tool to educate and empower others with information about various issues. The project that earned this recognition was Good Deeds, Volume One: Hats, which includes knitting (and crochet!) patterns surrounded by information about breast cancer, and the incredible resource Breast Cancer Connections. 100% of the proceeds from this collection benefits Breast Cancer Connections, and the e-book suggests making hats for a charity. 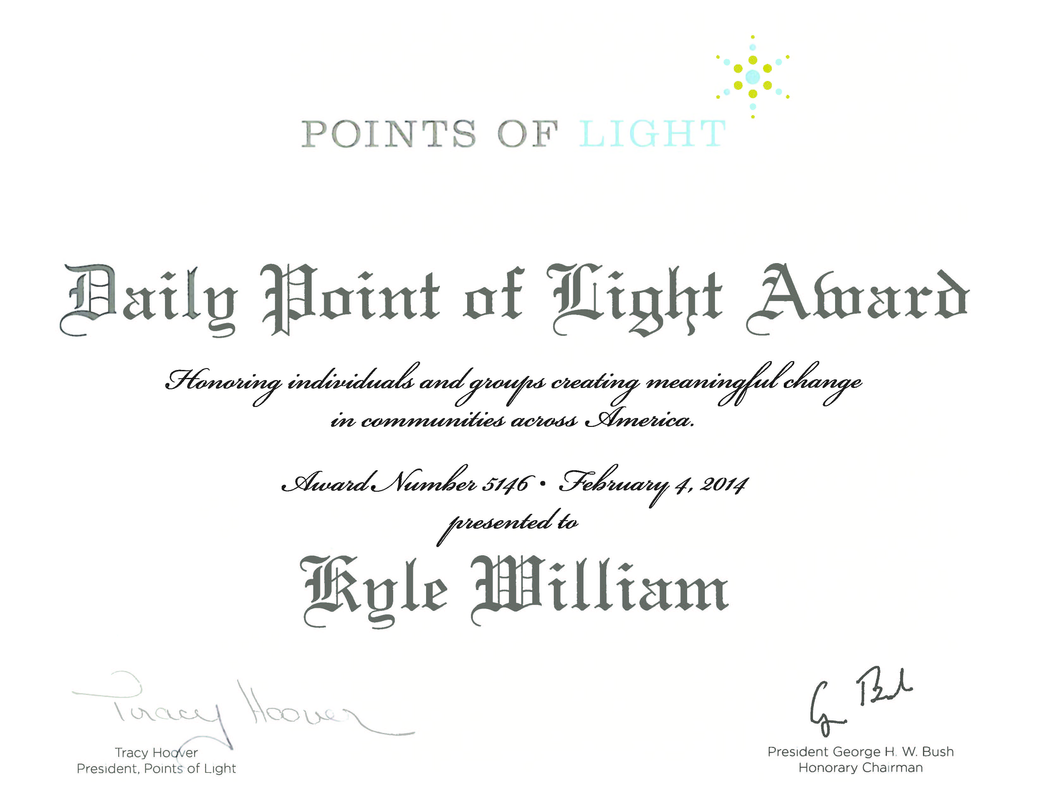 This honor was unexpected, and I'm humbled by the experience. (Of course, it couldn't have happened without the help of all the contributing designers and models!) In addition to the certificate, I also received this letter on President George H.W. Bush's letterhead: 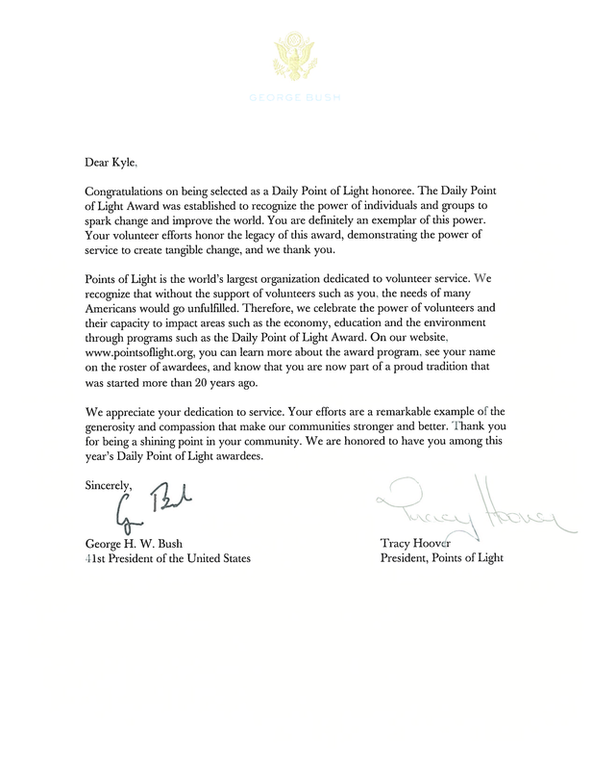 On the Points of Light website under my date and award number, you'll find this summary: AWARD NUMBER: 5146 Thank you to those who nominated me, and thank you to everyone who takes time out of their day to do good for others!
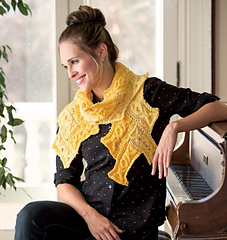
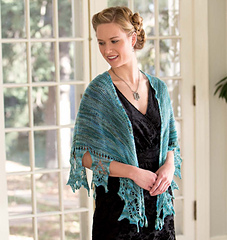
-KW 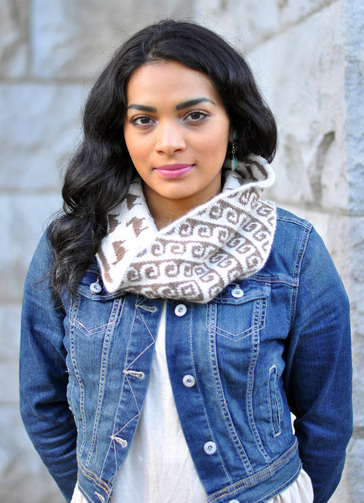 The inspiration for the Aymara cowl arrived the day I saw Jorge del Carpio's Kickstarter campaign for Fibras Andinas. I read the story of the Chilean herders tending their flocks 11,000 ft above sea level, and learned how the development of this new project would provide an opportunity for the purchase and use of the fiber from the animals. Over the next few months, I exchanged emails with Jorge and learned even more about his passion for helping his community. Once Nicole Snow from Darn Good Yarn joined on as the U.S. distributor, it was decided: I was going to design something special with this yarn. The outside of the cowl is inspired by traditional Aymara weaving patterns, and the inside features round after round of adorable llamas! It's knit on circular needles, and the beginning and end are grafted together hiding all ends and making the entire piece reversible and oh-so-cozy. This project takes two skeins each of 2 colors of sport weight yarn from Royal Llama (available in the United States via Darn Good Yarn). Is it soft, you ask? Most definitely. The fiber is de-haired llama. It's warm, luxurious, amazing to work with, and wearing the finished cowl is like getting a big hug from a long-lost friend. Of course, another benefit is knowing that your purchase of Royal Llama yarn helps support the Chilean llama herders! Skills needed | Provisional cast on, knit, purl, working in the round, stranded color work, Kitchener stitch. You will find the pattern on Ravelry HERE. The pattern will be available in a kit available through Darn Good Yarn and Fibras Andinas. 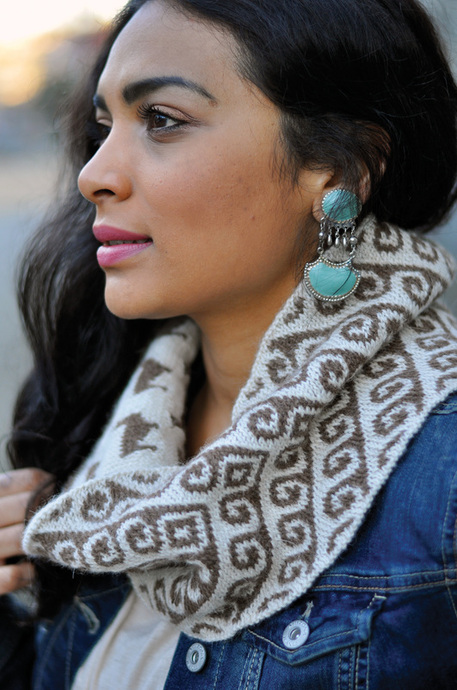 Aymara is available in English & Spanish as an individual pattern (via the link below): $4.00
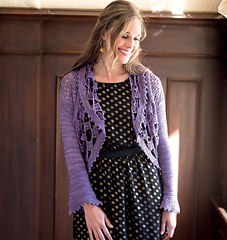
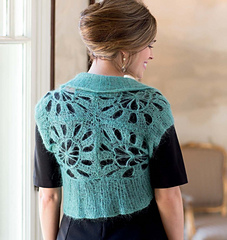
This is the second time I have had the pleasure of designing for Quince and Co.! This year I wanted to design a cowl that was simple enough for someone just venturing into the world of lace. Reversible, without being overly-complicated. A weekend of swatching and pondering yielded this new design. 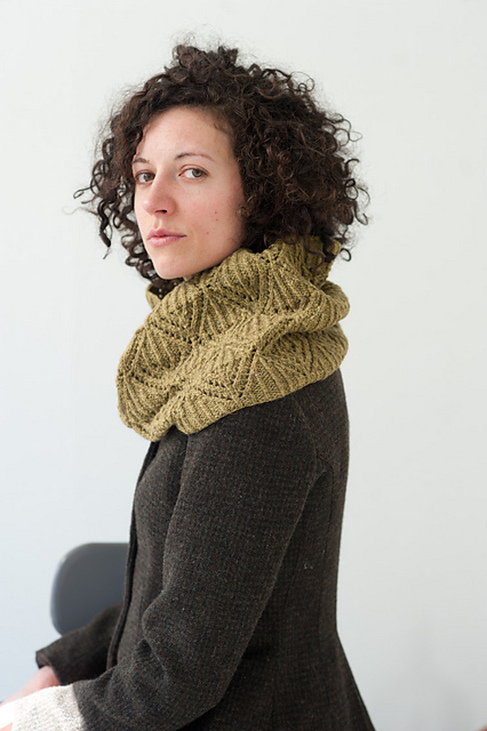
Garment Photographs: Carrie Bostick Hoge for Quince and Co.
Araminta requires basic knitting knowledge, including working in the round, increasing/decreasing, and finishing. Know how to knit, purl, yarn over, do simple decreases? Know how to do a twisted knit stitch? That's about all you need to know to make this cowl! ...And for those who have yet to work with Quince and Co. yarn, I encourage you to visit your LYS or order some online and give it a try. The colors are beautiful, and this particular yarn is soft, rustic, and familiar. 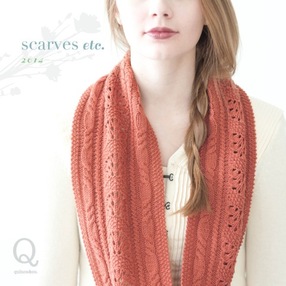 Of course, once you have the entire 14 pattern collection, it'll be hard to decide what to make first. There are options! Colorwork, cables, lace, pleats, asymmetrical wraps... the list goes on and on! All the photography is stunning (as usual). It, along with the e-book layout is done by the uber-talented Carrie Bostick Hodge. The yarn, I should say, is lovely. Owl is a favorite of mine because of its rustic feel. Not only does it work well with twisted stitches, it makes cables sing! Just a few weeks ago, Quince and Co. announced Owl Tweet! - the tweed version of Owl. I saw it at Stitches WEST and loved it. Perhaps someone will work Araminta in Tweet so I fall in love all over again. 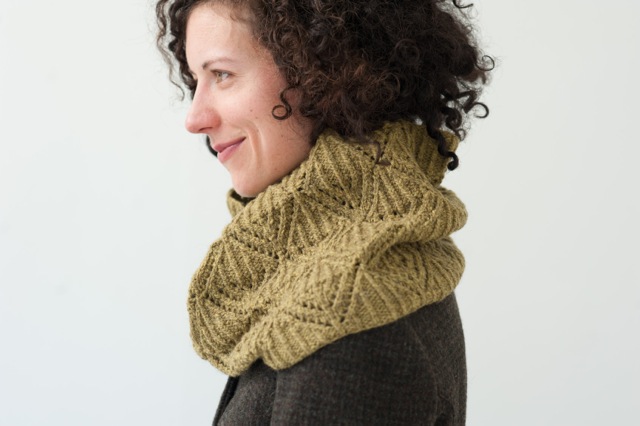
  There really is nothing like working with handspun yarn. And wearing a hat made from woolen-spun yarn is a comfy, cozy, toasty treat! I designed this hat for PLY Magazine's Winter 2013 issue using woolen spun 3-ply yarn made with Kyle William dyed BFL in the colorways Silver Thaw and December Sky (often available in the shop HERE). Carefully spun by NY spinner Aaron Bush, it was really a treat to be able to make a hat using materials that had been so lovingly prepared. The fibers come in 4 ounce quantities, and the hat uses under 100 yards of each color. When Aaron spun up the fiber, he blended the colors together by creating rolags of built-up tufts of fiber. This method created an evenly-varigated finished yarn. If you aren't yet a spinner, talk to other fiber friends, or check artist sites like www.etsy.com for options. Compare the yarn you're considering to the details in the project, and if it's close, chances are, it'll make a nice finished hat. And for those who prefer commercially spun yarn, a light worsted or DK yarn should fit the bill. This pattern is a little more difficult than others to re-size since the pattern repeat is so large. Altering needle or yarn size will change the finished dimensions.  © 2013 PLY Magazine  ...and beyond my small contribution, I have to tell you. PLY Magazine is chocked full of thoughtfully worded articles and beautiful images. Want to learn to spin? Already an expert? Seriously, this magazine has a lot of great information (it even includes some great product reviews!) I hope you'll check it out while you can! Deciding what to get for the holidays can be stressful. Fear not! I have created a list of suggestions for things I'm loving this season. Click on an image or link to be directed to the websites. 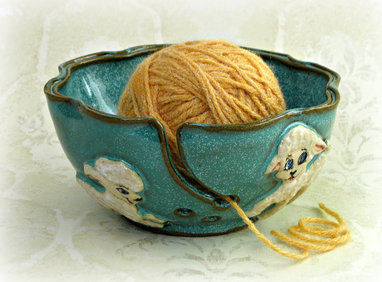 Handmade ceramic yarn bowls from Mud's Evolution Pottery! Crafted in Raleigh, NC, this cute bowl was thrown on the wheel and altered. Then the artist applied adorable little lambs cast from a hand carved mold. As you know I love ceramics. If this bowl is gone, consider a beautiful bowl. Useful for display of yarns and also works to hold yarns in progress. $54.00 www.etsy.com/shop/MudsEvolutionPottery 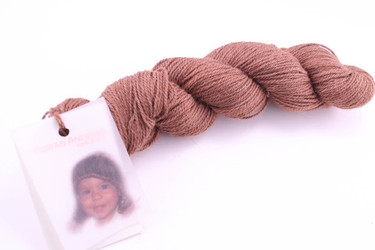 Darn Good Yarn is a fantastic fiber company founded by Nicole Snow. They use their business to empower women in Nepal and India while reducing waste. This year, Darn Good Yarn became the U.S. distributor of llama wool yarn from the Andes Mountains in Chile. Purchasing this yarn means helping out the Chilean farmers and their llamas. For the fiber connoisseur, llama is super warm, strong, washable, and even flame retardant! It's a less common fiber and one sure to be admired (and enjoyed)! This particular line of yarn is of the highest quality and promises to be the beginning of a cherished finished object. Darn Good Yarn also offers recycled silk and sari yarns, and a selection of ribbons. If you're unsure of what to get, consider a gift certificate. 50 gram, sport weight, 163 yards $26.41/skein www.darngoodyarn.com 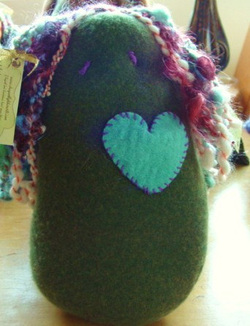 I. LOVE. THIS. DOLL. Yes, It's true. Part of the "Lovey" doll collection and made in RI, it features a cashmere body and handspun art yarn for the locks of hair. Carefully (and wonderfully) made, this is an adorable piece that could sit on a desk at work to remind the fiber lover of the spinning/knitting/crocheting/weaving fun that awaits them after a long day. Kate of Dragonfly Fiber Art is a fiber magician (and a good friend!) - I love her creativity and passion for making. There are a few pieces listed in her etsy shop, including this adorable piece! $65.00 www.etsy.com/shop/DragonflyFiberArt 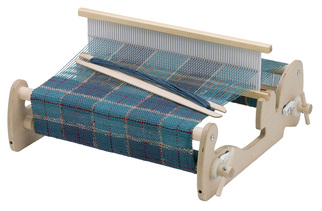 Schacht Cricket Looms are a perfect introduction to weaving for someone who is interested in broadening their horizons. I'd recommend buying the 15" width between the two, but either loom will easily make scarves, table runners, and placemats! They come with everything you need to get started (except the yarn) but if you talk to the good folks at Purlescence Yarns they can suggest some yarn to include in the shipment. Call them to plan the ultimate gift! (408) 735-YARN (9276) $145.00 10" $169.00 15" www.purlescenceyarns.com 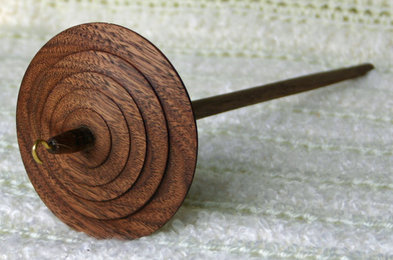 Michael Woody from Long Beach, CA makes beautiful and simple drop spindles. I LOVE LOVE LOVE this walnut parasol spindle. Hand turned with a special finish, this specimen is 3.75" dia x 10.5" long and weights about one ounce. Here's a little-known secret: I owned a few drop spindles long before I ever spun fiber into yarn. They make me happy sitting in a vase and from time to time I will take one out and marvel at its beauty and simplicity... remembering how so much yarn was spun from a tool this simple. $30.00 www.etsy.com/shop/SpindlersCottage  Natalie of Namaste Farms offers beautiful breed boxes. If you are buying for a spinner, consider one of these carefully curated collections. Each containing an ounce of 10 different breeds, it is a lovely introduction into cleaning raw fleece and trying out different fibers. (Oh.. and Natalie is AMAZING! She runs her CA based farm and works hard to educate others about the work involved in caring for a fiber flock.) $39.00 www.namastefarms.com 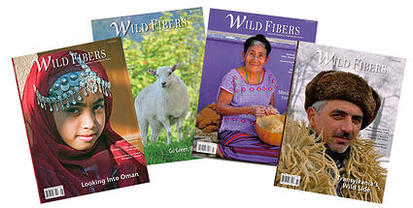 Wild Fibers Magazine Celebrating a decade of fiber excellence, Wild Fibers Magazine is the "National Geographic" of the fiber world. Dive headfirst into exotic destinations and learn all about the people (and animals!) that contribute to the crafts. Beautiful imagery and writing educate and inspire. A US gift subscription begins at $30.00 www.wildfibersmagazine.com  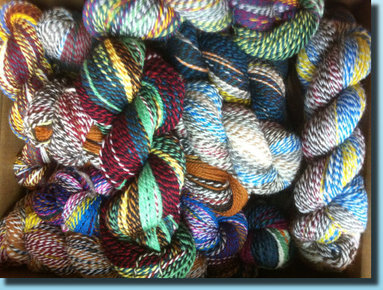 Stonehedge Fiber Mill makes fantastic yarn. My favorite (and a real eye-catcher!) is Stonehedge Crazy. Each skein is unique. They are made up of random bits of llama, alpaca, and wool in unpredictable colors. $8.50 / skein www.stonehedgefibermill.com  How about a knitting (or crochet!) bag that works for guys or gals? The SWIFT from Tom Bihn is still my favorite even after owning it for a few years. Offered in a variety of color and material combinations, it includes two clear interior zippered pockets, and an o-ring and key snap. It also comes with a Yarn Stuff Sack which is a clear bottomed drawstring project bag that will also become a fast favorite. Made in the U.S.A. Starting at $90.00 www.tombihn.com 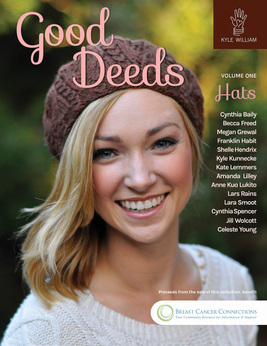 A collection of 15 hat patterns donated by designers across the United States and Canada, I created this volume of Good Deeds to benefit Breast Cancer Connections (a nonprofit based in Palo Alto, CA that offers support and resources to women facing breast cancer). This e-book is a great gift to give because it provides a library of hats to make, and all the proceeds from the sale of the project benefits a deserving nonprofit. $15.00 www.kylewilliam.com/good-deeds.html 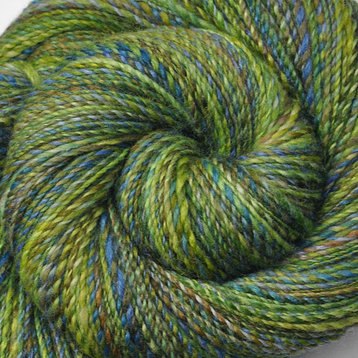 Spinning yarn takes time, patience, and skill. The artistry of Ilga shows up in her shop over and over. The time it takes to make yarn is worthy of proper compensation. I did a lot of searching for a good example of handspun yarn and settled on this WA based spinner because the pricing is set at a fair amount for the work that goes into the product. Fiber: 25% silk / 75% BFLwool Weight: 8.1 oz., 229 g Length: Approx. 820 yards, 750 m YPP: Approx. 1620 WPI: Approx. 18-22 Ply: 2 ply $82.00 www.etsy.com/shop/EdgewoodGardenStudio 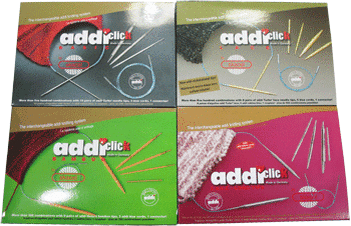 The best set of needles I own? Addi Turbo Long Lace Clicks. I like the longer length and sharper points of these needles, and REALLY love that I can change the length of the cord to suit my project. For VERY VERY VERY big projects (think blankets), there's a connector to join two cords together. Camilla Valley Farms has a great webpage that details the available sets and I'm sure if you get in touch with them they'd offer advice as to what they think your fiber lover will like based on what they knit. Their online shop is not automatic - you'll need to fill out their order form or give them a call: (519) 941-0736 to place an order. They also have gift certificates... so if you're totally confused, that's always an option! Begins at $169.00 www.camillavalleyfarm.com What items are on your wish list this season? Share in the comments and include website links if you have them. Here's wishing you and your family have a safe, happy holiday season!
Kristin Omdahl has written the kind of book I can wrap my imagination around. Knitting Outside the Swatch spends half the book explaining all the different motifs, and then the second half shows examples of motifs in ten different projects! I love the special bind off Kristin used for the motifs in the Shania medallion hat for the book cover! 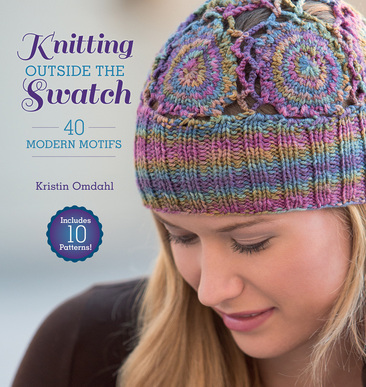 Interweave/F+W Media; $24.95 Kristin is known for imagination and talent with mathematics... and it shows through the pages of this latest title. She's created a lot of really interesting patterns for this book, and I believe that this resource is well worth adding to your library. Over 40 motifs are included, and with clear instructions on each piece, it's like having Kristin right there with you, showing you the way! As a lover of freeform knitting and crochet, I think of this book as an inspiration library. These small motifs use only a little bit of yarn, and they are creatively designed. One of my favorite motifs uses yarn wraps to hide a join, creating a beautiful finish. It's also a great chance to use up leftover yarns or for sample skeins. My plans include using this resource to knit up bits to include in a freeform wrap that I started a while back... These patterns are really a breath of fresh air! I also believe that motif collections like this help us to come up with new motif variations on our own. Work a few new pieces, and add them to your freeform scrumbles. See how these new bits might inspire new experimentation in your other work. The book is available in paperback or by digital download. Click the image above or button below to get yours right now, or head to your LYS to pick up a copy. If you'd like to dive right in, Interweave has a solution for you! Take your choice (digital or paper) and go ahead and order it now: GIVEAWAY!!! Completed: 11/16/13Want a free copy of Knitting Outside the Swatch? I have one to give away to a very lucky reader. Here's how to enter - Post in the comments, and tell me what is your favorite thing to knit? It could be one of her designs from the book, or it could be some other project... as specific as a certain pattern, or as generic as "socks!" Post your comment by 11:59PM PST Saturday, November 16, 2013 to enter. Be sure to include your email address when posting your comment so that I can contact you if you're the lucky (random!) winner. Thank you for sharing this post with your friends on Facebook or other social media sites! As always, thank you for taking time to read the blog. If you have any questions or comments for me, feel free to send me an email using the comment tab on the website!  CONGRATULATIONS! to Cheryl! She won the copy of Knitting Outside the Swatch, and I hope she has a wonderful time working the new motifs!
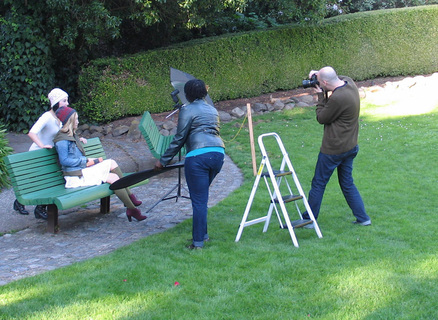 Shooting photos for the Good Deeds e-book Photograph © 2013 Jill Wolcott Shooting photos for the Good Deeds e-book Photograph © 2013 Jill Wolcott While so many fiber folks are posting, sharing, and commenting about their fluffy finds at Rhinebeck, I'm here in the studio working on layout and final edits for the upcoming ebook: Good Deeds, Volume One: Hats"! The project is almost ready, so I better get back to work. I just wanted to say "Happy Rhinebeck!" to everyone who is lucky enough to be there. While you're perusing the fiber, perhaps you'll pick up a couple skeins of yarn to knit a hat for charity? 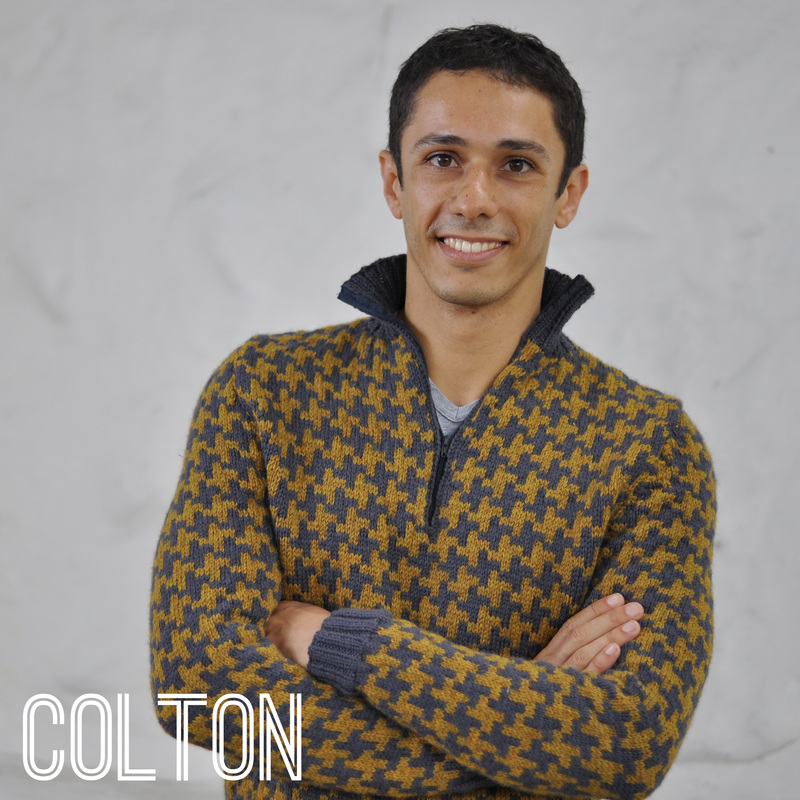
Full details about this design are included on the pattern page HERE.
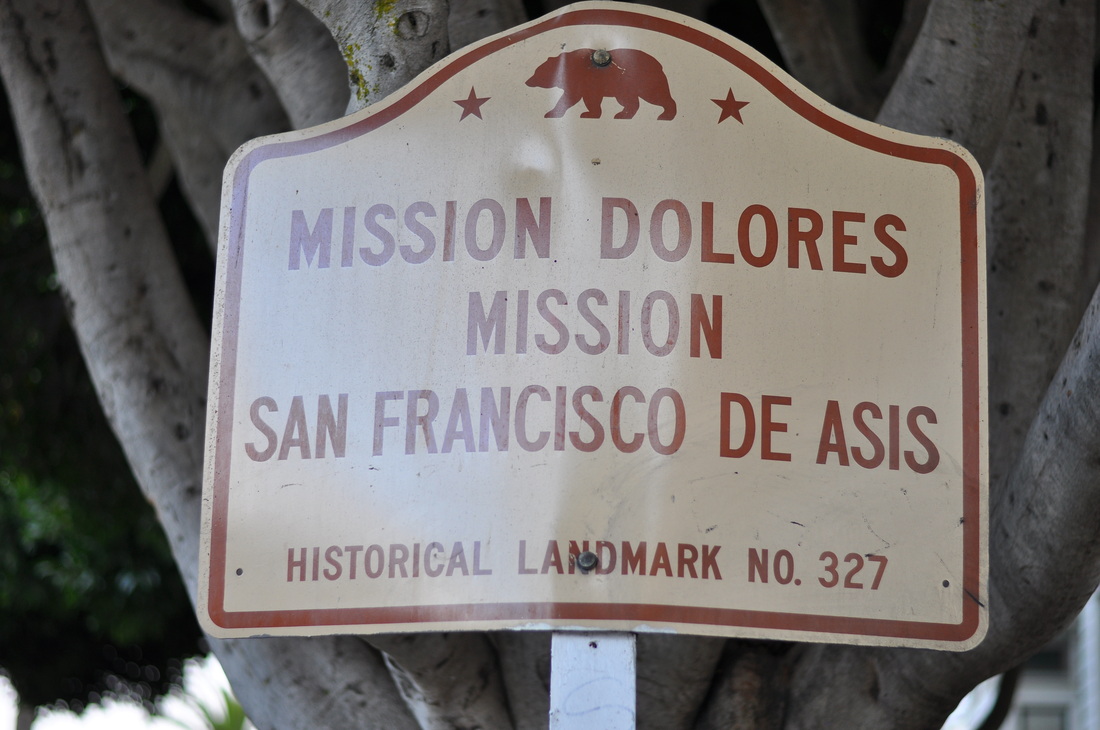
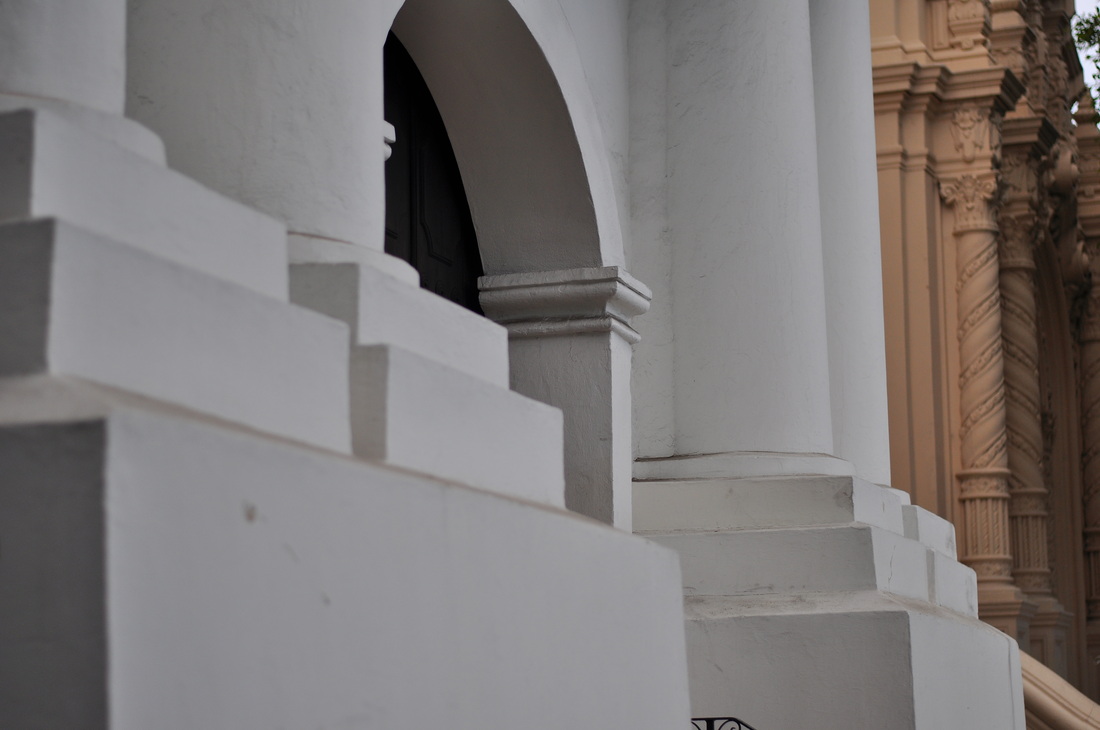
Exterior of the Old Mission Church, Mission Dolores, Dedicated in 1776
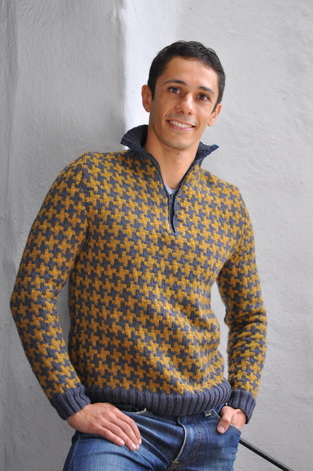
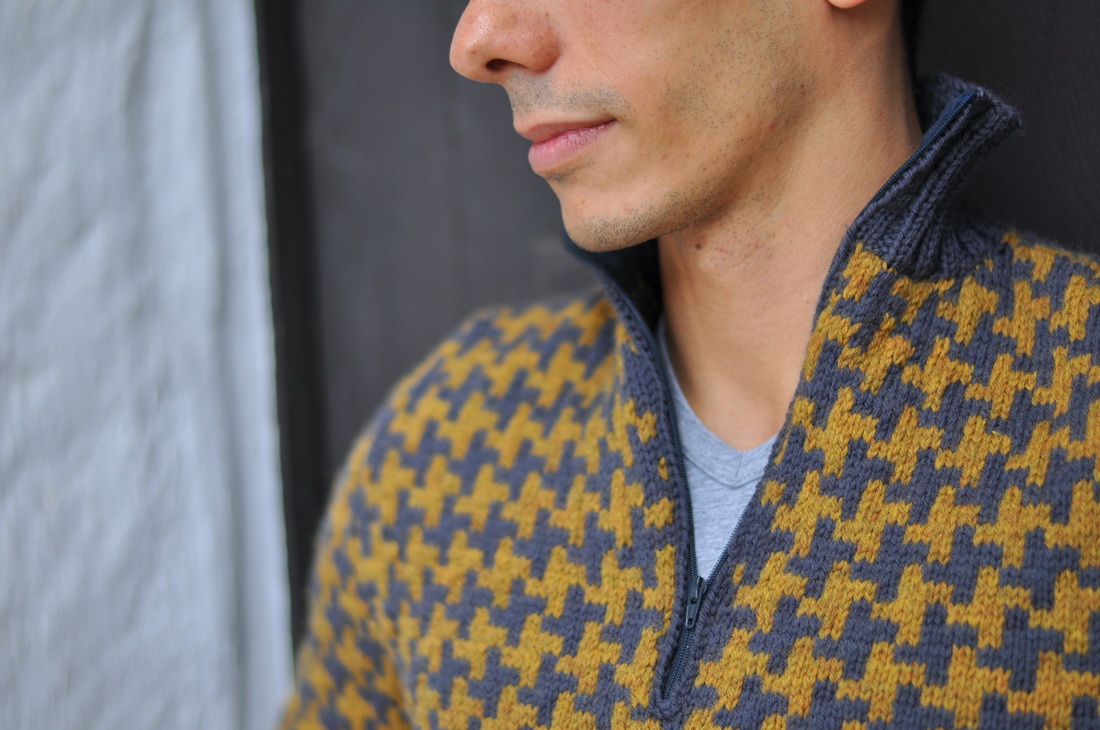
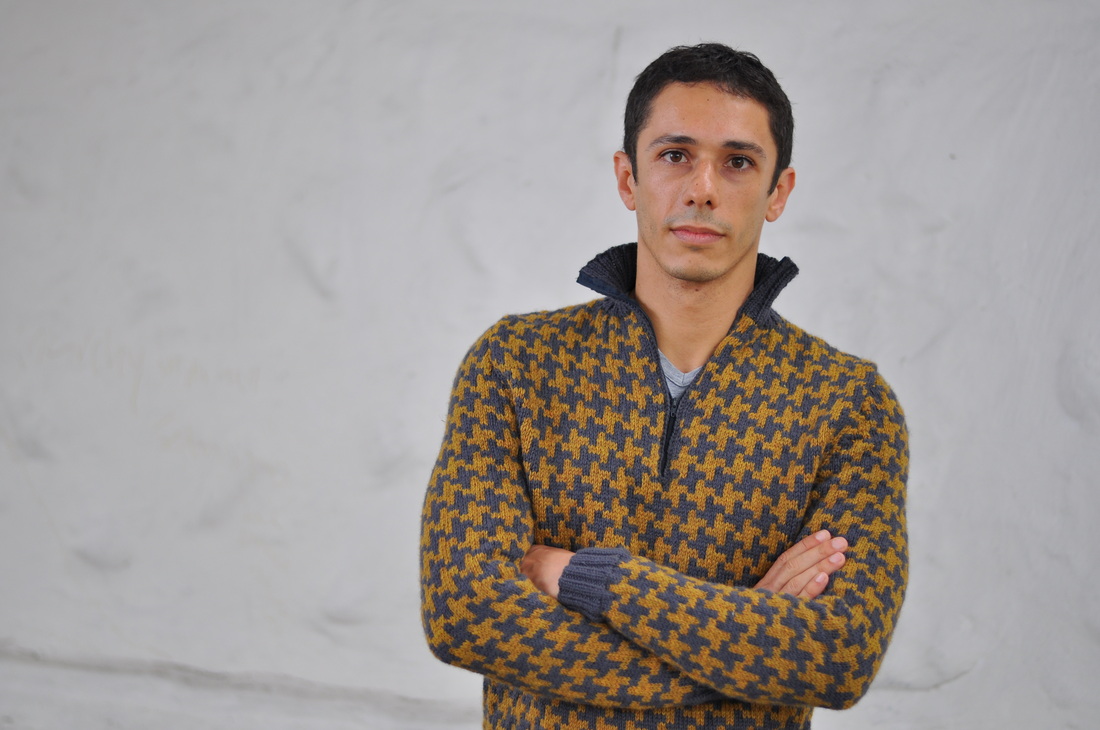
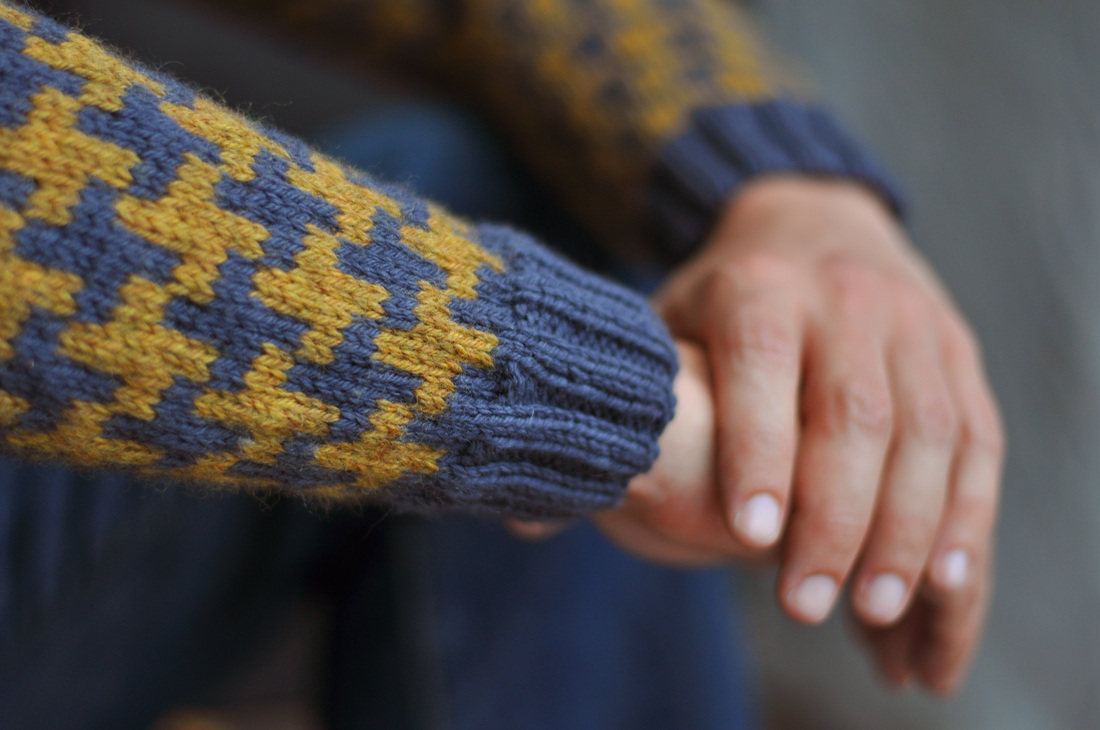
This men’s half-zip pullover uses a gently shifting motif to create a modified houndstooth motif. Carefully tailored with set in sleeves, and solid cuffs and hem, a zipper finishes off the neckline and completes this timeless design.
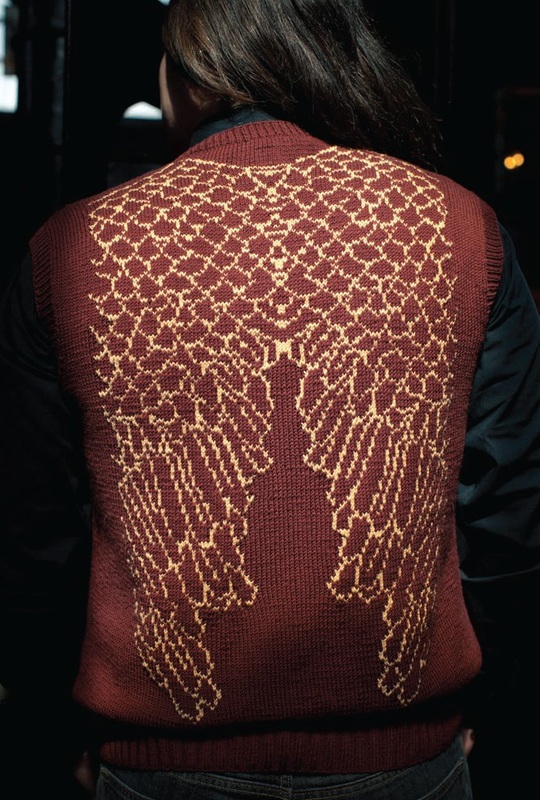
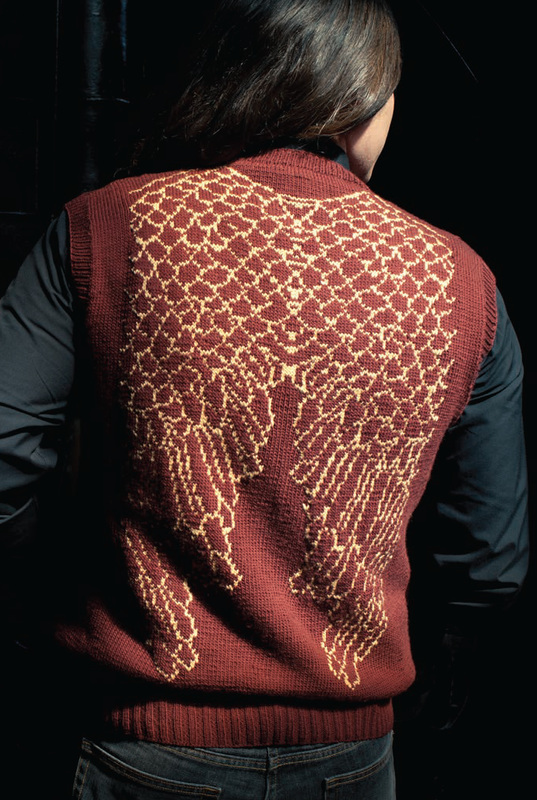
This pattern is worked flat and requires basic knitting knowledge, including knit/purl, increasing, decreasing, reading charts, stranded knitting, and finishing.  Back in mid-March, I mailed off a little bundle to Amy Clark Moore and her staff at Interweave. My very own contribution to the Unofficial Harry Potter Knits! Here it is, 4 month later, and I am finally able to share this project with you. The Order of the Phoenix Winged Vest uses Zitron Lifestyle (100% extrafine superwash Merino) in #54 Nutmeg and #33 Corn. It features a solid front and, when worn with a jacket, others can't know the secrets it holds. 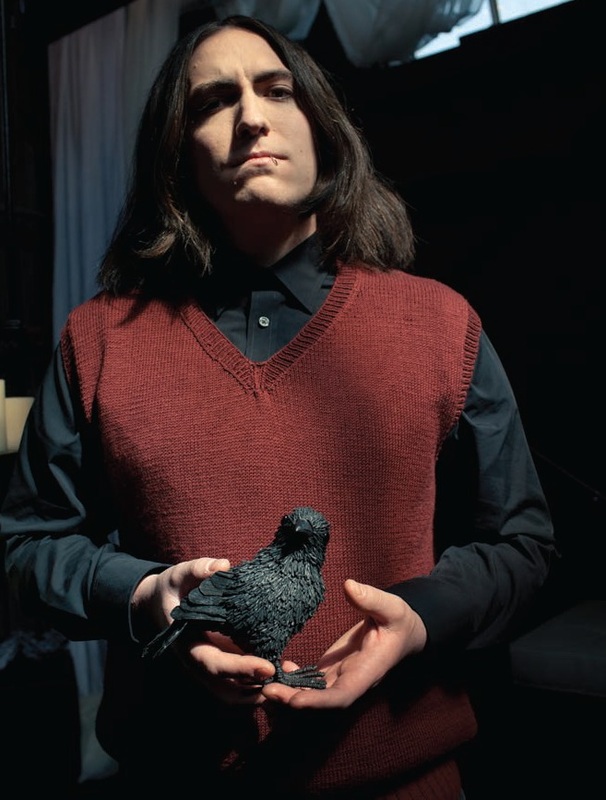
©Harper Point Photography for Interweave
The inspiration comes from the idea of the "hidden identity" of everyday superheroes. People (like policemen, nurses, and counselors) in our communities work hard to protect, educate, and serve. Out of uniform (or out of the office!) they blend into the crowd, unnoticed. We don't recognize they are the ones that do so much good when duty calls. It is interesting to me how these individuals carry with them such strength and knowledge, and others can so easily be unaware. They walk by us... on the streets or at the mall... but at work; when they're needed, they dive in. Head-first. Selflessly. While I was designing this vest I had in mind this idea of carrying around that "hidden identity"... it's more than the "secret powers" of heroes like Harry Potter - it's the real power of knowing what to do when a problem arises. It's also important to note that everyone has the ability to make a difference in the lives of others. Listening... Offering emotional support... Teaching "the tricks of the trade" to someone new to your field... Taking time to write a letter... Visiting people in the hospital. The small efforts we make turn us into true heroes in the eyes of others. I hope the Order of the Phoenix vest will help others appreciate the heroes of their communities, and to find time to recognize the knowledge and talents of those around them.
The Unofficial Harry Potter Knits will be available at your Local Yarn Shop or through the Interweave website. If you can't wait to cast on this (or any of the other AMAZING projects) in the magazine, you can hop on over HERE and download an electronic copy right now! (Due to copyright restrictions, this magazine is only available for sale in the U.S.) 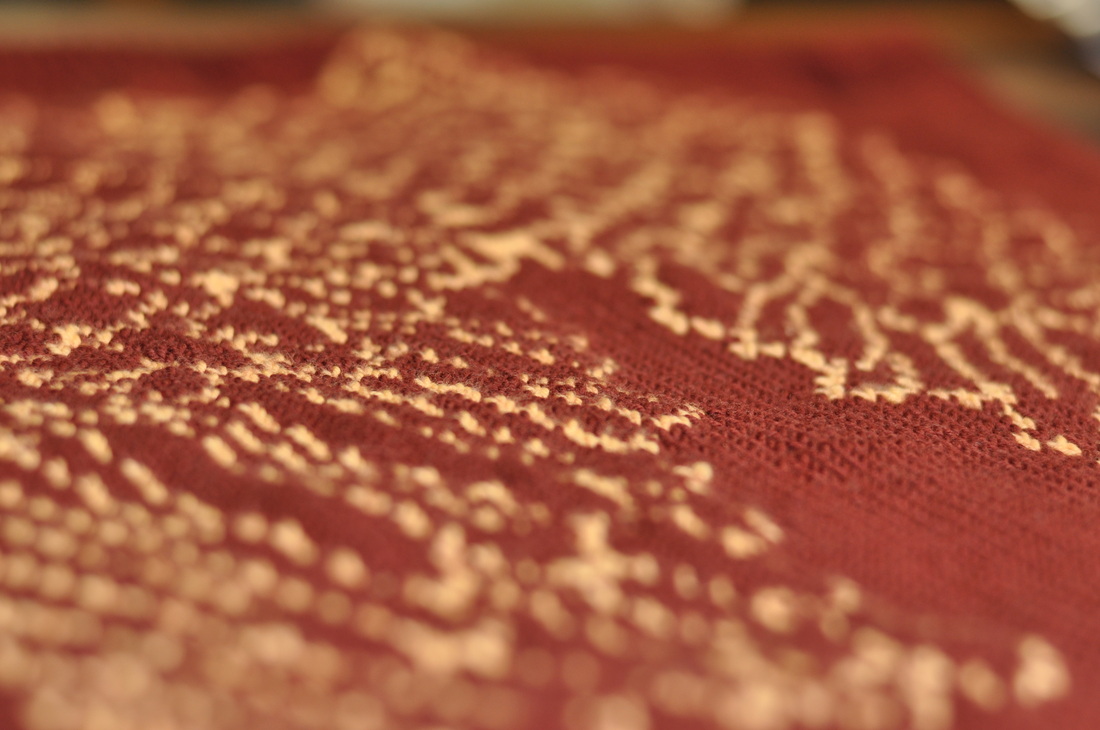
|
Archives
July 2023
Categories
All
|


 RSS Feed
|
ExploreFor Fun
|
Support |
Connect |
© 2006-2023 Kyle William. All Rights Reserved.